As an example, I’m going to show you my process for editing and grading RAW/MLV files recorded with Canon 5D Mark III:
- Process MLV files with MLVFS
- Generate Proxies with DaVinci Resolve (ISSUE #1)
- Import proxies into Premiere
- Do the EDIT (ISSUE #2)
- Export the timeline to XML
- Import the XML into Resolve, relink the footage to the RAW clips
- Do the final grading
- Export the graded clip
1. Process MLV files with MLVFS
Download and install MLVFS as an Automator workflow as described on the Magic Lantern forums.
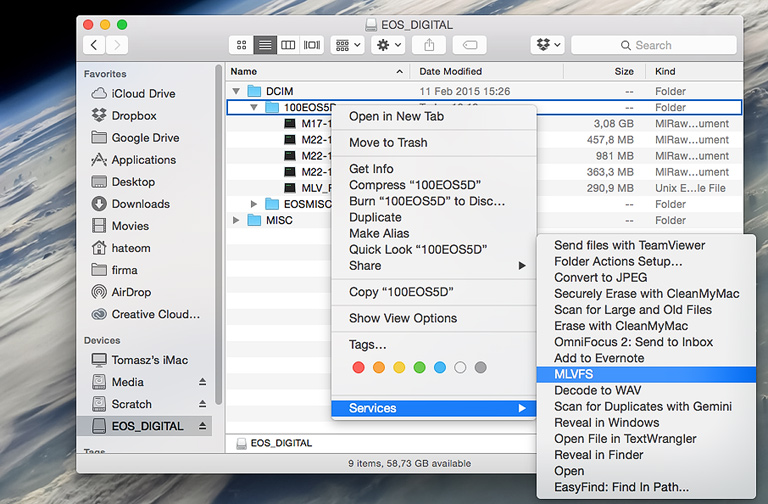
Navigate to your MLV files location and right click on the parent directory:

Select MLVFS. New folder selection for the output files will appear – choose an empty folder where you want your dng files to be mapped to. Once it’s done a web page will appear:

Here you have a few options to adjust the MLV conversion settings. I use the settings pictured above.
2. Generate Proxies with DaVinci Resolve
In this step, we need to import our dng files into DaVinci Resolve:

Please note that the Reel Name field is empty at this point. This is the first detail in the process that will lead to some unpleasant issues if we don’t fix it.
Issue 1 – Reel/tape names
Reel name in Davinci Resolve and Tape name in Premiere Pro is a metadata information which is used to link the media between the 2 programs.
If we render proxies out of Resolve for editing, they have to contain this information in order to be able to link them with the original RAW files after the editing is done in Premiere.
If this information is not there Resolve won’t be able to match the clips and the Premiere edit won’t be imported back to DaVinci.
Reel names are automatically generated for media files in most cameras automatically (for instance BlackMagic cameras) but the problem appears with Magic Lantern RAW files (.raw, .mlv).
Reel Name fix
To fix the problem we can populate the fields manually but it’s not the ideal solution especially if we are dealing with tons of files.
Another way is to tell Resolve to generate Reel Name metadata using file/directory name of the DNG files. To do that we have to go to the project settings and select two options in Master Project Settings / Conform Options:

When we hit apply and close the window the fields are no longer empty:

Now we can proceed to the Proxy export. To do that let’s navigate to the Deliver panel in Resolve and use the settings like these:

Please keep in mind that almost all the options in green boxes are essential for the process to work properly (except for the codec).
3. Import Proxies into Premiere Pro
To confirm that our changes in Davinci Resolve worked ok, let’s have a look at the imported clips in Premiere Pro:

Find a column Tape Name in the project window and make sure it’s not empty. If we missed the Reel Name generation step in Davinci Resolve before, the Tape Name here in Premiere Pro would be empty now.
4. Do the EDIT in Premiere Pro
There is another danger during the editing for the whole process to fail – Subclips.
Issue 2 – Premiere SubClips
Subclip is a very nice feature in Premiere Pro helping us get organized. It’s part of my editing workflow and I had to learn the hard way that they are not compatible with Resolve Importer (or Premiere Pro XML exporter for Final Cut Pro).
If you try to export your timeline containing subclips, in Resolve you will see your timeline after import and on the first sight it will look ok, but after a closer look you will notice that the IN and OUT points are wrong. All the clips will begin from the very beginning of the clip instead of the selected IN point for the SubClip.
XML Export Subclip Fix
The solution for the subclip XML export is:
- Not using SubClips when editing in Premiere Pro
- Converting each SubClip to Master Clip before exporting to XML
- Using After Effects to open Premiere Pro project file and saving it again out of AE – it doesn’t support subclips so it will convert all the subclips automatically (this will not work with the roundtrip as the reel/tape names are lost during this process)
If you are just exporting the timeline for color correction and grading and there is no need to relink the footage in Resolve you can always render the while timeline and use the splitter in Davinci. This option will work 100% of a time, however, requires a bit more work.
To convert a subclip to a normal clip (Master Clip) right click on the subclip and select Edit Subclip:

and then check the option Convert to Master Clip:

5. Export the timeline to XML
When we make sure there are no subclips in our timeline, we can proceed to the XML export by selecting: File / Export / Final Cut Pro XML…
6. Import the XML into Resolve, relink the footage to the RAW clips
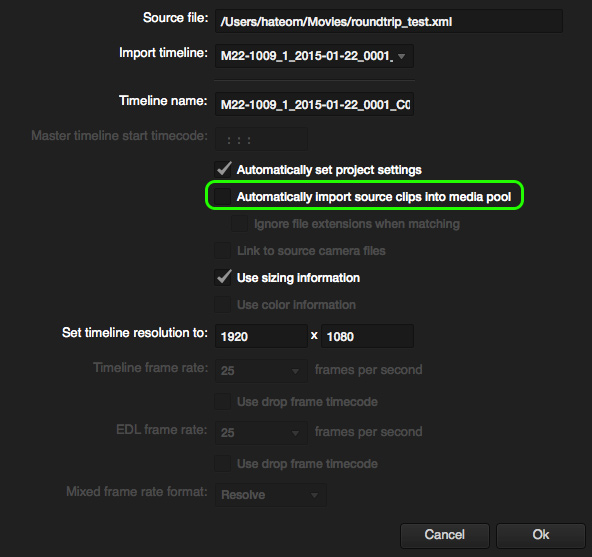
There’s one more detail that we need to be aware of – when we import the XML file back in resolve, we need to make sure the option Automatically import source clips into media pool is unchecked:

This way Resolve will try to link the clips to the original DNG files. It can do that using the metadata information stored in the files that we previously put there – Reel Name or Tape Name. If we didn’t do that before, now Resolve would complain that it’s not able to relink the footage, and our editing effort would go to waste.
Final steps 7. Do the final grading and 8. Export the graded clip
Now when our timeline is back in Resolve with the original DNG files linked we can go ahead and do the corrections and grading with the best quality footage we have.