- How to deal with almost 1TB of RAW footage
- Do you have to spend hours rendering proxy files to be able to edit them?
- ACR or Davinci Resolve?
I you haven’t read the first part, head out to the previous one first. This post is a continuation of the process describing the postproduction phase of a project shot exclusively on 5D Mark III using Magic Lantern RAW.
In this part I’m going to answer to the above questions and give you some ideas how to deal with tons of RAW footage and how to do it efficiently.
Data
As you already know I ended up with almost 1TB of RAW footage. What did I do first? Backup.
Once our data is safe these are the steps I follow:
- Import all the footage into Davinci Resolve
- Apply very general color correction to the whole timeline (probably some sort of LUT to preview the footage in Rec. 709).
- Initial selection – reject all the useless footage. Clips that were recorded accidentally, not properly focused or just really bad takes that we know we cannot use for sure.
Proxy files
Our timeline consists now of the clips that might be used for the editing. To be able to edit the footage in Premiere Pro we need to transcode the footage. Luckily Resolve handles DNG files very well and Proxy generation is pretty fast.

Why not to edit in Resolve? If you intend to edit and color correct/grade in Resolve as well, you are good to go. But in case you want to do the color correction and grading in After Effects, editing in Resolve will cause some problems (I will get back to this later).
I use ProRes LT or Proxy for my proxies and I export them as individual clips.
The edit
Editing a music video is usually easier than editing a short movie. First of all you have the music track that you have to align all the clips to. Most of the takes were recorded to the music being played in the background, so the first step is to sync all the clips to the original track.

What I do in this case is I group all my clips into 2 categories:
- Music clips
- B-roll
The first one has the music in the clip itself so it can be synced with the audio track. However some of the clips containing music go to the B-roll category when the music is not relevant. It might be just a closeup or a part without singing, that we can put in any place in the video.

Once the clips are categorized I take them one by one and align them to the main track. If the reference audio is good enough, the clip can be synced automatically in Premiere (or some other 3rd party tool like Plural Eyes). If not, we need to do that manually.
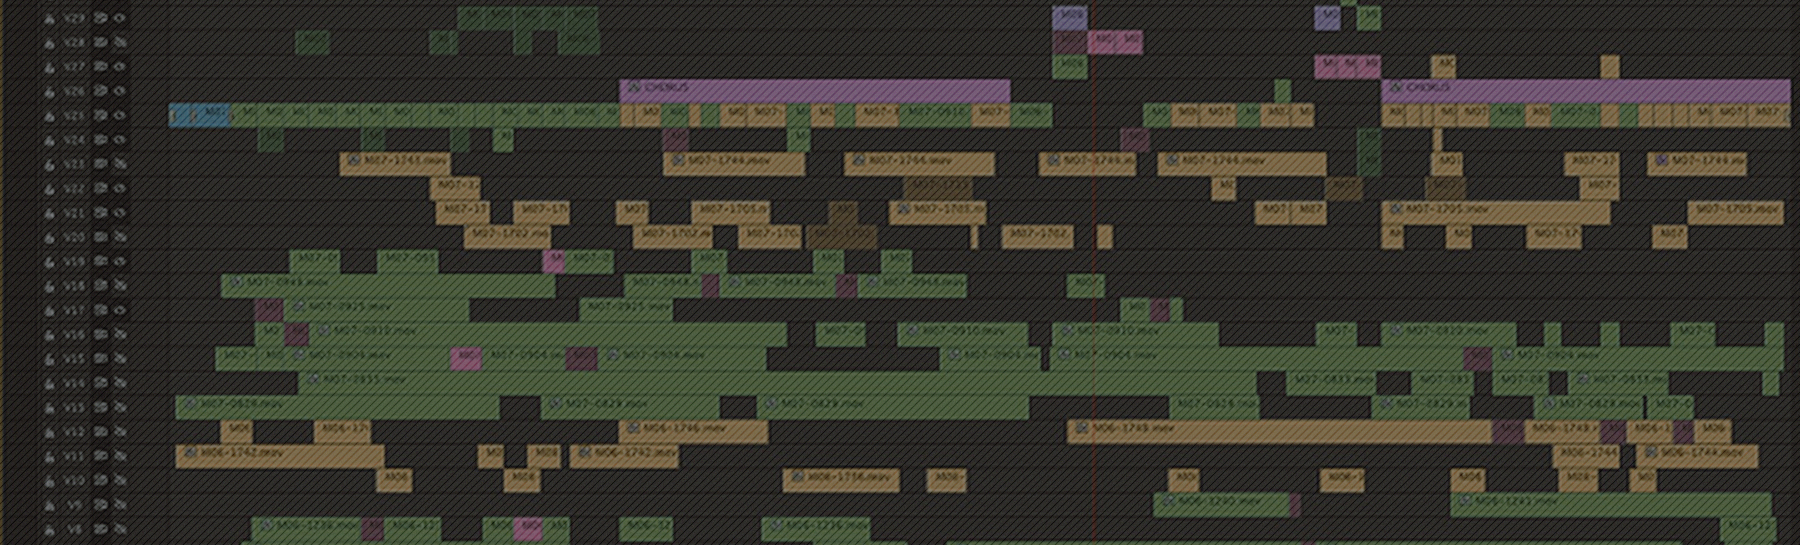
When all the clips from the first category are on the timeline, the next step is to pick and reject. I hide all the layers except for the first one, and I go along and cut the best pieces out of it. Once I’m done with it, I enable the second one and repeat. When I’m done with all the tracks it looks more or less like that:

At this stage I create separate timeline with my B-roll takes, and I try to pick and reject as much as possible.
Then I would copy all the remaining pieces to the main timeline.
Depending on the quantity of takes and angles it might happen that we don’t have enough coverage from the music clips – then we cann fill the gaps with the B-roll. In my case there were no gaps so I just edited the whole video moving the b-roll around the synced clips in many iterations until I was happy with the cut, which looks more or less like this:

Multicam
Multicam feature in Premiere Pro is another approach to edit the video, but in my opinion it works well with fewer clips. In my case editing 24 tracks with multicam was not that convenient so I just edited it in a regular way. Additionally, running multicam with 24 tracks would kill my hard drive… I would probably need to transcode all the clips to a really low resolution and bitrate to be able to playback all of them in real-time.
Color correction and grading
After the editing is done and we are left with the final cut it’s time for the color correction and grading.
In the part 3 I will cover how my process look like in detail. Stay tuned!
Other parts
- Part 1 – in the field
- Part 3 – grading (in progress)